Nov 20, 2013

Building the world's cheapest baby monitor

It's time for my little baby daughter to sleep in her own bedroom. 
However, we would like to monitor her from our bedroom in case she wakes up crying. We have a baby phone from First Years, but somehow it seems I cannot get along with it. It might be because our baby is mostly whimpering and rarely crying. And let's not forget my reluctance to use wireless technology, especially near my baby.

So I decided I should build a baby phone monitoring system.
I had a pair of old PC speakers, I guess everybody has such somewhere around and I told to myself why not connecting a microphone directly to the speakers? They are active speakers, meaning they have their own power supply, so it should work. 


Well, googleing a little bit I found out it won't work, due to the difference between the voltage microphone outputs and the voltage expected as input by the speakers. The microphone's output voltage is about millivolts, while the speakers expects input signal of a few volts as depicted in the image below.


So, I had to use a preamplifier in order to amplify the electric signal generated by the microphone to ~ 0.7 volts. The one I used is produced by a Romanian company, I found it in a local shop for around 5$.


It also contains an embedded microphone which I decided to use.
Since the active speakers are powered at 12v, I used a 4 wires cable so, besides transporting the voice signal, I could be able to power the amplifier as well.

I opened the powered speaker's case, drill a small hole in the rear, plugged the 4 wires cable trough it and finally soldered two wires to transformer's +12v and ground. The result should look like this:


On the other end, I soldered the +12 volts (red in the picture below) wire to the preamplifier's power pin, the ground (thick white) to the preamplifier's ground pin and a third one (green) to the preamplifier's mic output.


Eventually, on the speaker's end I have cut and opened cable's isolating shield so I could access the wires.  I soldered a 3.5 mm audio socket, connecting the mic output to both stereo left and stereo right pins.
In the end I connected the speakers' audio plug to the audio socket.

So here it is, as i promised the world's cheapest baby monitor!

Project cost:
Old speakers: free
Old mic - not needed eventually: free
Preamplifier: 5$
3.5 mm audio socket: 1$
7 meter of 4 wires cable: 1$
Total cost: 7$

If you plan to build a similar project, I have listed two similar preamplifiers which could be easily acquired from eBay:
If you like, you could look for others. Anyhow, I strongly suggest to use a preamplifier powered by the with the same voltage as the speakers, in order to use the latter as a power source and save an additional unit for powering the preamplifier. 
An additional advantage for doing that would be switching the preamplifier on and off from the same switch used to power on /off the speakers.   


If you liked my project feel free to leave a comment.  

Nov 19, 2013

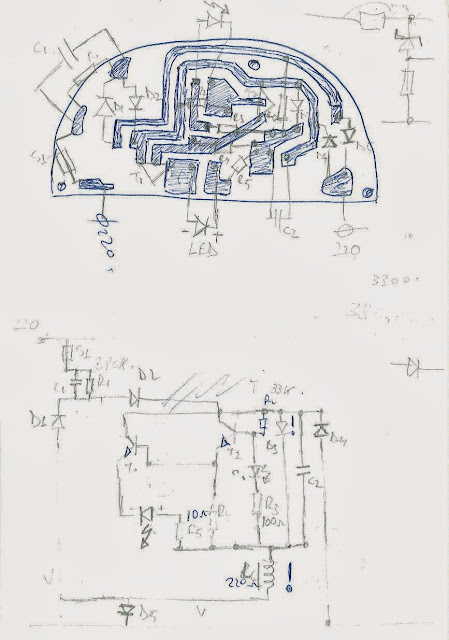
My first diagram of a circuit board

Last night I have drawn my first diagram of a circuit board.

The era of  electronic devices home repair has long gone. How ever it was extremely fun to practice drawing diagrams and tying to pin point the faulty component, a thing my father used to do frequently during my childhood, spending countless hours to fix  TV sets for friends or relatives.

The board is quite simple, the product is a night light which suddenly stooped working after about two months. That annoyed a lot so I decided to have a look inside.


I found out that the diode D3 on the schematic above was faulty. It's about a zener diode 1N473A which I have replaced with an equivalent bought with 0.1 euro from a local shop.

Even if it was  working somehow after I have removed the faulty diode, it's now working beyond the doubt when replacing it with a new one.
Feeling proud.

Many thanks to my father for the electronic lessons I didn't pay attention during my youth and for patiently reminding me now things I have once learned and soon forgotten.  

Nov 11, 2013

How to control Android device over USB connection

The following article describes my actions related to my particular environment and the particular set which is working for me. No warranty or respectability for any damage or side effect is taken.
However, I will do my best to answer questions posted on the blog in order to help other to configure the same.
The article assumes one has the phone drivers and  adb  already installed.


Since I use to spend countless hours in front of my PC and since most of the time a have my Android mobile connected to the USB charger, I considered some options to control the phone via browser.

Wouldn't it be convenient to read or write SMS from your PC, using a full size keyboard? Wouldn't it be great to access contacts, or systems settings trough the browser? Oh boy, I know I'd loved that!

Looking to the Market (to be noted I prefer the old Android Market naming in stead of new Play) I found a few nice Apps. like AirDroid, Remote Desktop, 3CX DroidDesktop etc. Out of all, the later - 3CX DroidDesktop, previously known as LazyDroid - is the only one which runs over an USB connections, so the one tho choose.

So far so good, until I realized there are a lot of options to perform prior to benefiting out of this marvelous set up: one needs to first connect the Android device to the computer using the USB cable, run the connection.bat script, start a browser and point it to the local address using the right port. To much for my taste... no wonder I preferred the App. known as LazyDroid.

So I started to look for ways to automate things.

Plug In Launcher. It gives you the possibility to run an application when connecting an usb cable, headsets etc...and it does it for free! :)
So I have downloaded and installed Plug in launcher on my phone and configured it to run 3CX DroidDesktop whenever it detects an USB cable connection towards a PC.

Using the instructions provided on the following link http://www.mobiledevicemanager.com/3cxdroiddesktop/manual/usb-screenshots-windows/, I have developed the following script:

@ECHO OFF
ECHO Running the connect.bat script content from C:\Program Files (x86)\Android\adb_win
:begin
set Pathname="C:\Program Files (x86)\Android\android-sdk\platform-tools"
cd /d %Pathname%
adb forward tcp:8999 tcp:8999
adb forward tcp:5901 tcp:5901
adb forward tcp:2221 tcp:2221
adb forward tcp:21000 tcp:21000
echo Now shoud be lounching http://localhost:%port%/ in browser
start chrome "http://localhost:8999/"


The script uses adb commands and part of the script connect.bat in order to configure the port forwarding. For simplicity I have decided to use the default port 8999.
Not to forger, one has to enable USB debugging in order this to work.


Further on, I needed to find a way to run the above script (called AndroRemote.bat) automatically on my PC when connecting the Android phone, the same way as I did above with the Plug In Launcher. Think is that I wouldn't like to use any additional application, but use the embedded Task Scheduler in stead.

To do that, I had to find out an event related to connecting the mobile phone to the PC's USB port. I have managed to find it in the Event Viewer, under Applications and Servvices >> Microsoft >> Windows >> DriverFrameWorks - User Mode >> Operational.


The event number in my case is 2101, as can be seen in the picture below. Further on, right click on the event would allow the possibility to attached it to the Task Scheduler and trigger an action.


The next images will illustrate how I have configured the Task Scheduler.